The honest truth is that Will It Blend? started with us fooling around. I mean, we had an objective, but YouTube was brand new and at the time we didn’t really see the “marketing” side of people posting silly videos on the Internet.
George Wight, the marketing manager at the time, asked me to set up a shoot where Tom would blend a bunch of things (marbles, rake handle, can of Coke, Big Mac meal, etc). George got that inspiration from watching Tom test the power and durability of blenders by blending 2x4s down to sawdust. My job was to film Tom and make it interesting.
If you watch the first 10 or so Will It Blend? episodes, you’ll see Tom with almost no comedy, no lines, no gags or sound effects. Tom basically said, “Here are some marbles; I think we’ll blend these.” That’s it.
The “don’t breathe this” line came from a joke I did during the first shoot. Tom had blended a ton of items the first few days we were shooting. I think we cranked out 6–10 episodes. When Tom got around to blending marbles (the first blend we posted), he joked that we shouldn’t breathe the demolished marbles because they were made out of pure glass, and if we were to breathe in the particles, we could get silicosis.
To be funny, I copied Tom’s warning from the marbles video and pasted it into the following episodes. It was an inside joke but eventually became a staple of the series.
Whether behind the bar or in the kitchen, we all want to be a little bit more efficient, to do more in less time. It can get hectic during service no matter how seasoned a professional you are, and moving faster can often seem easier said than done. Here, four women who’ve conquered speed bartending competition Speed Rack — which not only showcases women behind the bar, but also raises money for breast cancer research and educational initiatives — break it down for us and share their keys to success.
1. It all starts with the set up
Whether opening your own bar or working in someone else’s, set up — both daily and long-term — can make or break your quest for working speedier.
“It starts with how the bar is actually built, where you put the sinks…how high your rail is, how deep everything is, all of that stuff is super integral to being able to work quickly and efficiently,” says Caitlin Laman, a bar consultant and former bar manager at Trick Dog in San Francisco (and Miss Speed Rack 2014).
Photo by Gabi Porter, Courtesy of Speed Rack
Yael Vengroff, bar director at The Spare Room in Los Angeles (and Miss Speed Rack 2012), agrees. “I think that, too often, we see these bars being designed by the contractors, or the architects, or the design team, and it’s not someone that’s actually been behind a bar before. That’s where you run into a lot of issues where it’s like, ‘oh, you know, we didn’t think about putting a sink here,’ and that’s ultimately the most important thing,” she says. “Do you have the ability to clean your tools right away, and next to you? Because if you can’t clean your tools, you’re gonna walk all over to the other side of the room, then the longer it’s going to take for you to be ready to make the next round of drinks.”
Beyond the construction phase, organizational choices can similarly let you work at your quickest or slow you to a crawl.
“[A] lot of your POS systems, you can run summary reports at the end of the week and you can see what are your highest selling items, highest selling spirits, highest selling cocktails, highest selling beers… those are the things that you need to have close to you,” says Brittini Rae, bar manager at the Venice Whaler in Venice Beach and Miss Speed Rack 2015. “[I]f you sell a whole bunch of Bulleit bourbon, but Bulleit bourbon is on the third shelf all the way on the left, you know, you’re constantly going to pick up that bottle, but you sell it 68 times a night, why? It may look beautiful there, but if that’s the case, then have one in the well and have one on the back bar, so it always looks pretty, but you have it close to you.”
A place for everything and everything in its place, as your mom or grandma probably told you once or twice. According to Eryn Reece, who was crowned Miss Speed Rack in 2013 and is now starting up the bar program at New York’s Sons and Daughters, opening at the end of the month, it’s true behind the bar as well.
“[E]verything has [to have] a home,” Reece says. “Because the minute you’re having to stop and search for something, it’s going to become a huge issue. Especially when some of these people have a more expansive cocktail menu, it just makes sense that everything goes back in the exact same place every single time,” Reece said.
How your well is set up can also make a difference. Don’t force yourself to stick to the same old, vodka, gin, rum, tequila format, adds Brittini Rae. She and Reece both suggest switching it up and organizing or grouping by cocktail, rather than a predetermined rule. It helps remind you what’s next, too, in case you’re so busy you forget.
2. Don’t put extra things on top of the bar
We’ve all seen the stacks of napkins and coasters, container of straws and little box of maraschino cherries and lime wedges on the bar right in front of where the bartenders are working—and the guests are sitting or standing. In some ways those are convenient spots for them, but when you’re going for speed, extra odds and ends can just get in the way.
“A lot of times they have their POS systems on top of bars, right in front of guests’ seats, where we’d be sitting, and bartenders are constantly trying to reach around,” says Brittini Rae. “If you’re trying to reach around anything on top of the bar, whether you’re trying to deliver a drink, or you’re trying to clean up a spill, or just wipe a table down, you’re automatically adding seconds to your night because you just put something in your way.” She adds that garnish stations are a common obstacle. “I know the glass garnish station has been very popular, which is great, but that needs to be on either end of the bar or it needs to be so far in the bar that it’s not in the way,” she says. “[T]here’s a bar I went to once that has, like, a beautiful bitters tower, like a Lazy Susan but with bitters on it, but it’s three shelves high. It’s beautiful, but it’s right on top of the bar and bartenders have to constantly move it,” said Brittini Rae.
3. Teach yourself to be ambidextrous
It’s not just a crazy thought: some speedy bartenders really are ambidextrous, and it helps them move even faster.
“I’m right-handed but I bartend left-handed because that’s how I was trained,” says Laman. “It makes me really able to do a lot more things because my dominant hand is not activated as much as my non-dominant hand, so I have the ability to do so many more things because I have that dominant hand free, in a sense. And so, if you set your bar up in a way that kind of trains you to use your non-dominant hand more, it frees up your dominant hand and gives you the ability to do a lot more things,” she says.
For bartenders—or anyone—wanting to try? “[I]t takes about three months for you to finally get used to it,” Vengroff says.
4. Know your stuff
Recipes are crucial, and on busy nights there’s not much time to slow down and think. Make sure you know your recipes and your techniques—it’ll boost your confidence.
5. Think ahead and take only one step
“[A]lways just think about what your next step is,” says Brittani Rae. “I think that’s kind of a no-brainer, you know, don’t step more than once and always think about what your next step is and doing it in your head before you get to it. When you’re making cocktails, if you’re making three drinks and they all have lime juice, you shouldn’t be picking up that bottle of lime juice three times… if all three drinks have lime juice, you should be able to put lime juice in all three tins and then go back to finish building the first one. You should never have to pick up a bottle twice on an order — ever.”
6. Don’t look down on batching certain ingredients in advance
“We batch the spirits in a cocktail, so we’re able to provide these complicated, complex cocktails to the guests, but we can still get them out quickly because it’s only a three-bottle pick-up instead of seven,” says Vengroff.
“I feel like in the past, it may have been a little looked down upon, but we’re at a certain point where people don’t want to wait 25 minutes for their cocktail anymore — they’re over that,” adds Reece. “There are so many places they can go for good drinks these days, they’re like, ‘oh, this place takes too long, I don’t want these 12-ingredient cocktails,’ but there’s easy ways to smartly batch out a blend of, like, a quarter ounce of three different syrups that make your cocktail a little bit more interesting and have a little bit more level of flavor,” she says. “If you’re batching out a quarter ounce of ginger, orgeat and cinnamon, you put it in a 3/4-ounce pour. It’s just such a quick little thing.”
Ultimately, getting the basics down (and with that, your confidence up) is the best place to start, says Brittini Rae. “Once you’re confident in that, and you feel that you have that second nature to designing drinks, then, speed is going to come, because you’re just going to keep getting better and better.”
Generally speaking, a foodservice consultant is an independent professional advisor who, for a defined scope of work and related fee, works as an advocate for their client in achieving their goals through the design and implementation of foodservice facilities and/or operations/management systems. Consultants provide expertise, knowledge and experience to provide assistance that does not exist in-house, or by providing resources not available at the time. As independent professionals their primary focus is the welfare of the client organization that they serve.
Very knowledgeable in the foodservice and hospitality industry
Provides specific/specialized expertise
Usually involved for limited, specified period
Brings high degree of industry experience
Advises and educates clients on wide range of topics
Provides independent, objective advice
Facilitates between project team and foodservice operations professionals
Acts as an advocate for foodservice operations
Enhances client’s business
COMMON FOODSERVICE CONSULTANT SPECIALITIES INCLUDE:
Accounting & Finance
Beverage System design
Capital Budgeting
Compliance Certification
Contract Management
Dietary & Nutrition
Due Diligence
Equipment Surveys
Facility Assessments
Finance Raising
Food Safety & Hygiene
Human Resources
Interior Design
Kitchen Design
LEED Planning/Design
Mgt Recruitment & Development
Master Planning
Operating Procedures & Systems
Operator RFP Selection/Monitoring
Revenue Generation
Strategic Financial Analysis
Training
Workshops and Education
Architectural Design
Business Strategy
Code Compliance
Concept Development
Culinary Development
Distribution/Procurement
Energy & Environment
Executive Coaching
Feasibility Studies
Food Production Systems Design
Franchising
Imagineering
IT Systems, Sourcing/Mgt
Laundry Design
Legal Advice/Litigation Support
Marketing & Promotion
Menu Development/Engineering
Operations Review & Re-Engineering
Quality Management
Space Planning
Sustainability
Waste Management Design
Workstation Ergonomics/Design
HOW CAN I TELL IF I NEED A FOODSERVICE CONSULTANT?
A decision has been made to undertake a development/design project involving construction of new foodservice facilities.
Ownership/Management have made a decision to renovate existing foodservice facilities
Ownership/Management had identified a need to have an evaluation of existing facilities conducted as part of a long range capital budgeting process
Ownership/Management has identified the need for a master planning exercise
A decision has been made to develop or re-engineer a foodservice operation/concept
Ownership/Management believes that operational performance could be improved but is not sure what to do to make those improvements
Ownership/Management does not have the specific knowledge and skills necessary to solve an identified problem
Ownership/Management has the necessary knowledge and skills but does not have the time necessary to solve the problem
Ownership/Management requires an independent, third-party opinion, either to confirm a decision or to provide alternatives
Ownership/Management’s efforts have not produced the desired long-term results
HOW DO I FIND A COMPETENT FOODSERVICE CONSULTANT?
You can seek referrals from a variety of sources for help in finding and selecting a competent foodservice consultant. Your network of professional colleagues, your trade association and the local restaurant association are all good sources of information. You may also choose to turn to the Foodservice Consultants Society International for assistance. We have an online consultant search function on this web site or you may contact one of our administration offices closest to you.
When considering a foodservice project, a FCSI consultant should be your first choice. FCSI is the only such consulting society that operates on a worldwide basis. FCSI maintains a global focus with members in over 45 countries dedicated to providing the highest quality of service. FCSI consultant members must abide by a strict Code of Ethics and Professional Conduct. They work efficiently to achieve total client satisfaction and always maintain independence from the supply side of the industry.
The FCSI Code of Conduct is guided by three master principles (in order of priority):
The Client’s Interests
The Public’s Interests
The Profession’s Interests
Consultant members are required to participate in the FCSI Continuing Professional Growth program by attend educational seminars that focus on cutting edge developments in the foodservice industry. Members also have the benefit of networking with other professionals in the foodservice industry during Society sponsored events and activities. In order to gain acceptance into the Society, members must meet strict criteria assuring their experience and over all professionalism.
HOW DOES AN FCSI CONSULTANT OPERATE?
Foodservice consultants operate as independent business people with firms ranging in size from one person to large operations with multiple offices around the globe. Some consultants work primarily close to their home base while others are spanning the globe with projects on several continents.
– Independent of the supply of goods to the industry
Does not supply/sell equipment
Does not work for a commission
Serves only the best interests of the Client
– Negotiates a fixed fee for a defined scope of work prior to beginning an assignment
– Could work directly for owner, operator, developer, or architect
– Normally has several clients concurrently
MAKING THE RIGHT CHOICE:
There are a few factors to consider when selecting the correct foodservice consultant for your undertaking:
Ask colleagues and other well-informed industry executives for several referrals. Check each one’s credentials and give each candidate the same criteria for your project.
Ask for references and follow up on them, asking:
Were you satisfied with the services performed?
Would you hire this consultant again?
Did they meet your deadlines?
Did the consultant coordinate properly with other specialists on the project?
Ask each consultant to describe their best approach to your situation. This isn’t asking or details – just a general description of the problem-solving process.
Visit and inspect some of their projects. If that’s not possible, call the operators and talk frankly about their level of satisfaction with the consultant’s performance.
Attempt to interview each finalist in person. Face-to-face meetings are invaluable.
The two key parts of your restaurant are the production area, where the food is prepared, and the public area, where your customers either dine or make their carryout purchases. The major factors to think about in terms of a restaurant’s design are the size and layout of the dining room, kitchen space, storage areas and office. Dining space will occupy most of your facility, followed by the kitchen and preparation area and then by storage. If you have an office on the premises — and you should — that will most likely take up the smallest percentage of your space.
The customer service area is important because it determines the first impression your restaurant will make on your guests. It must accurately convey the atmosphere of the restaurant in a way that takes advantage of the space available. Your customer service area should include a waiting area for customers, a cashier’s station, public restrooms and a bar, if you choose to have one. Other than fast-food or quick-serve establishments, most restaurants have bars or at least serve beer or wine.
Most upscale restaurants don’t have a cashier area where patrons walk up and pay. Instead, the waitstaff typically collects the payment at the table and takes it to the bar cash register. They then bring the change back to the table or return with the credit card slip to be signed.
You can use your cashier’s station as the host or hostess station, or you can set up a separate station at the threshold between the customer service and dining areas. A host or hostess stand usually consists of a small wooden podium with a ledger or computer keyboard and monitor for recording the names of waiting guests.
The waiting area itself should have a few benches lining its walls. Don’t skimp on these seats. They should be cushioned, unless your theme dictates otherwise, so your customers are comfortable during their wait. If the wait turns out to be long, and if your seats are hard and uncomfortable, chances are you’ll lose customers and generate some bad word-of-mouth.
In many restaurants, a bar will generate a good portion of the operation’s revenue. Generally speaking, you should have one bar seat for every three dining seats. For example, if you have 150 dining seats, your bar should have about 50 seats, including bar stools and seats at tables. Allow about 2 square feet of floor space per stool. Your tables should have about 10 to 12 square feet per customer.
A bar also provides an additional waiting area for your restaurant. It’s a good place for your customers to relax and enjoy themselves while their table is being prepared. You can also serve food at the bar, which is especially beneficial when you have a long waiting list. Also keep in mind that many restaurants either take a guest’s cell phone number or provide an electric electronic pager to contact their waiting guests.
Dining area
This is where you’ll be making the bulk of your money, so don’t cut corners when designing and decorating your dining room. Much of your dining room design will depend on your concept. It might help to know that studies indicate that 40 to 50 percent of all sit-down customers arrive in pairs, 30 percent come alone or in parties of three and 20 percent come in groups of four or more.
To accommodate various party sizes, use tables for two that can be pushed together in areas where there’s ample floor space. This gives you flexibility in accommodating both small and large parties. Place booths for four to six people along the walls.
The space required per seat varies according to the type of restaurant and size of the establishment. For a small casual-dining restaurant, you’ll need to provide about 15 to 18 square feet per seat to assure comfortable seating and enough aisle space so servers have room to move between the tables. People don’t like being crowded together with other diners. Keep in mind that while you want to get in as many people as possible, you also want return customers. It is often said that 80 percent of business comes from return customers. If people are crammed in and don’t enjoy their dining experience, they won’t be likely to return.
The furniture and fixtures in your dining area should match your concept and be appropriate to the market you’re trying to attract. For example, a family-style restaurant needs to have comfortable tables and booths that can accommodate children’s booster seats and highchairs. A fine-dining establishment should be more elegant, with tables situated to provide your patrons with privacy.
Regardless of the type of operation you choose, the quality of your chairs is critical. Chairs are expensive, and how comfortable they are — or aren’t — is the second most common source of environmental complaints in restaurants (the first is noise). But while your seats should be comfortable, they shouldn’t be too soft, either — you don’t want customers falling asleep. They should also allow for ease of movement. Diners should be able to get up and down easily and slide across seating surfaces without tearing clothing or hosiery. And they need to be sturdy. When an overweight customer sits down or even tips a chair back on one or two legs, the chair shouldn’t break. Also, choose materials that can tolerate abrasive cleaning products as well as the abuse of being stacked and unstacked.
Develop a uniform atmosphere all through the public areas of your restaurant. That means the décor of your waiting area, dining room, bar and even restrooms should match. Also, be sure your waiting area is welcoming and comfortable. Whether your customers are seated immediately or have to wait awhile for their tables, they’ll gain their first impression of your operation from the waiting area, and you want that impression to be positive.
Production area
Too often, the production area in a restaurant is inefficiently designed, and the result is a poorly organized kitchen and less-than-top-notch service. Your floor plan should be streamlined to provide the most efficient delivery of food to the dining area.
Generally, you’ll need to allow approximately 35 percent of your total space for your production area. Include space for food preparation, cooking, dishwashing, trash disposal, receiving, inventory storage, employee facilities and an area for a small office where daily management duties can be performed. Allow about 12 percent of your total space for food preparation and cooking areas.
Keep your menu in mind as you determine each element in the production area. You’ll need to include space for food preparation, cooking, dishwashing, trash disposal, receiving, inventory storage and employee facilities, plus your office area.
The food preparation, cooking and baking areas are where the actual production of food will take place. You’ll need room for prep and steam tables, fryers, a cooking range with griddle top, small refrigerators that you’ll place under the prep and steam tables, a freezer for storing perishable goods, soft drink and milk dispensers, an ice bin, a broiler, exhaust fans for the ventilation system and other items, depending on your particular operation.
Arrange this area so everything is only a couple of steps away from the cook. You should also design it in such a way that two or more cooks can work side by side during your busiest hours.
You’ll want to devote about 4 percent of your total space to the dishwashing and trash areas. Place your dishwashing area toward the rear of the kitchen. You can usually set this up in a corner so it doesn’t get in the way of the cooks and servers. Set up the dishwashing area so the washer can develop a production line.
To make your production area as efficient as possible, keep the following tips in mind:
Plan the shortest route from entrance to exit for ingredients and baked goods.
Minimize handling by having as many duties as possible performed at each stop — that is, at each point the item or dish stops in the production process.
Eliminate bottlenecks in the production process caused by delays at strategic locations. When things aren’t flowing smoothly, figure out why. Be sure your equipment is adequate, well-maintained and located in the proper place for the task.
Recognize that the misuse of space is as damaging to your operation as the misuse of machinery and labor.
Eliminate backtracking, the overlapping of work and unnecessary inspection by constantly considering possibilities for new sequences and combinations of steps in food preparation.
Set up the dishwashing area so the washer can develop a production line. The person responsible for washing dishes should rinse them in a double sink, then place them into racks on a small landing area next to the sink. From the landing area, the racks full of dishes are put through the commercial dishwasher, then placed on a table for drying. The size and capacity of your dishwasher will depend on the needs of your operation.
Receiving and inventory storage spaces will take up to about 8 percent of your total space. These areas should be located so they’re accessible to delivery vehicles. Use double doors at your receiving port, and always keep a dolly or hand truck available. Locate your dry-storage area and walk-in refrigerator and freezer adjacent to the receiving area.
Because most food-service businesses require employees, you should also have a private room for them that includes a table, a few chairs, a closet or garment rack (to hang coats and street clothes after staffers have changed into their work clothes), lockers for safe storage of personal belongings and valuables and a restroom. The staff facility should not take up more than 5 percent of your total space.
You’ll also need a small area where you or your manager can perform administrative tasks, such as general paperwork, bank deposits and counting out cash drawers. This space is essential even if you have another office at home where you do the majority of your administrative work.
Casters are special housings that include wheels and they facilitate those wheels being attached to equipment. Many people interchange the terminology of wheels and casters as meaning the same thing and for the most part that works out to be accepted. However, when we want to really analyze the subject of casters, it is important to break them down into all of the important components. Components such as the wheel, the tread of the wheel, the barring that make the wheel spin, the mounting plate, and even how the wheel locks and swivels are important to know and understand.
A caster is simply designed for mobility of equipment. The equipment needs to be mobile, whether it sits in a corner of a commercial kitchen and only needs to be moved for easy access for cleaning, or if it’s a large banquet cabinet that needs to be loaded onto trucks and moved to off-site locations. These two applications require different consideration when it comes to wheel tread, hubs, and bearings. A caster that supports equipment without being moved very often can tend to get flat spots from sitting still, so a wide dense tread with bearings that require little to no maintenance is best. Adversely, equipment that will be pushed over thresholds, bumps and gravel, roll well with a soft tube-less semi-pneumatic tread, with Zerk grease lubricated raceways and bearings.
The environment the equipment is in can play a large part in your purchasing decision as well. The bulk food warming cabinet that hangs out in the corner of a commercial kitchen needs a caster that can roll on the smooth surfaces of the kitchen floor while being resistant to the cleaning agents that are used when cleaning those floors. Some applications, such as in healthcare patient meal delivery, need casters that can roll around hushed environments on equipment that must be as quiet and tranquil as possible. These delivery cabinets, in the highly sanitized healthcare facilities, are commonly spray washed inside and out. Without the properly sealed bearings, the casters will become corroded from the cleaning.
Size matters but bigger are not always better. If the cabinet is one that will be sliding in and out from under a counter, being sure to pick the correct size caster will be paramount in your decision. It should also be known that typically the larger the wheel diameter is the easier it will roll. Remember this terminology for the size of your caster; Wheel Diameter – This is the distance measured vertically from one side of the tread to the other, Tread Width – The distance measured laterally across the tread, Overall Height – the total distance the caster raises the cart of the ground from the tread to the fastener plate. Generally, the larger the casters are, the higher the load capacity they can carry. This becomes spread out across all of the casters, so if you have typically four casters on your cabinet, you will divide your total weight across the four casters. Assuming you have a cabinet that weighs 100lbs and it has a load weight of 900lbs, your total weight would be 1000lbs. As stated before, this weight will be divided by each caster giving you a total of 250lbs per caster.
High-speed or rapid-cook ovens refer to any oven that uses two or more heat transfer methods to reduce cooking time by more than 50 percent. This equipment may combine microwave technology with convection, impingement or radiant heating. Although units in this category don’t always include a microwave component, the majority utilize this technology for rapid heating along with another source for browning.
The biggest benefits of this equipment are speed and versatility. These benefits make high-speed ovens popular in quick-service operations, schools, healthcare facilities and retail spaces, where operators prepare anytime meals, serve multiple dayparts or offer convenience-style foods.
These ovens support a variety of applications, but most often they heat and serve menu items at the front counter. Food that is already produced, such as pizza or appetizers that cook in the oven, can be finished or reheated in dual-technology ovens. Items that take more time to cook, such as soufflés, can be prepared quicker with the help of these ovens. Although the units also can be used for raw proteins, this is not common in commercial applications.
Larger operations commonly use high-speed ovens in conjunction with other cooking equipment, such as fryers, to increase speed of service. Units that combine microwave, forced convection and infrared radiant heat offer cook times that can be as much as 15 times faster than a conventional oven, which can help increase menu flexibility. Some compact microwave/convection oven models cook four times faster than conventional ovens.
These countertop units provide powerful, versatile operation in a small area, maximizing space for operations with limited footprints. With the increasing issue of limited back-of-house space, along with expanding menus, these ovens have become more popular.
The majority of high-speed ovens have stainless steel construction both inside and out and ceramic plates inside. This equipment may include adjustable, chrome-plated legs and ergonomically styled handles.
Another benefit is that these units are extremely efficient to run since most of the day is spent on idle. This drives operational costs down to just a few dollars a day on average for most operations.
Most high-speed ovens are designed for countertop use, with depths between 20 and 30 inches. Capacities vary, with units accommodating ¼- to ½-size sheet pans, full-size hotel pans and 12- or 14-inch pizzas.
These ovens are generally electric, requiring at least 30 amps and either 208 or 240 watts. Temperature ranges vary depending on the type of oven but are typically between 150 degrees F and 550 degrees F. Microwave wattage ranges from 1000 to 2000, depending on the unit.
It would be difficult to find a high-speed oven model that isn’t ventless, which is one of its biggest selling features and allows these units to be installed in virtually any operation or location. Most high-speed ovens are designed to be stacked, further maximizing space, capacity and volume.
These ovens generally provide multiple set point temperatures, with some models offering automatic programming for close to 400 menu items. The data keys allow for the electronic transfer of cooking programs, which can save cooking time and aid in product consistency. Many models are moving toward resistive or capacitive touch-screen controls, which are user-friendly and intuitive, rather than push-button interfaces.
Some high-speed ovens are Wi-Fi-enabled and can be connected to the internet for uploading recipes. This allows operators to leverage technology by sending menu updates to equipment in multiple locations and expand on limited-time offers more easily.
Operators may choose from various exterior colors with some models, which is beneficial for units used in the front of house. Some types also offer windows for users to view the cooking process taking place. An auto-unloading feature on some ovens presents the food to operators upon completion.
A number of high-speed oven accessories are available, including Teflon pans, sheet metal pans, baskets and pizza screens.
In the next few years, it is predicted there will be a switch from vacuum tube-style magnetron technology to solid-state technology for launching microwaves into these ovens.
Unless you’re eating sushi, no one wants undercooked fish. The amount of time it takes to cook fish depends on the type of fish you’re cooking, the size of the fish and the method that you’re using.
Methods, such as baking, sauteing, broiling, poaching and steaming, follow a 10-minute rule. For baking, set the oven to about 400 to 450 degrees Fahrenheit.
Determine how thick the fish fillet or whole fish is at its thickest point. For every inch, plan for 10 minutes of cook time. So, if your fillet is 1/2 inch thick, you’ll need about five minutes.
Tips
Use the 10-minute rule for stuffed or rolled fish, too. Simply measure right before you put the fish in the oven, when the fish is completely prepped.
Turn the fish approximately halfway through the cooking time. But, if the fish is thin — less than 1/2 inch thick — turning is unnecessary.
The fish is safe to eat once it’s reached an internal temperature of 145 F when you insert an instant-read thermometer into the thickest portion. Thin fillets — such as sole — can be visually inspected for doneness.
Tips
For fish that’s cooked en papillote, wrapped in foil or parchment paper, or in a sauce such as curried fish, add five minutes to the cook time. If you’re cooking fish straight from a frozen state — double the cook time. For example, a 1/2-inch steak needs 10 minutes.
A fish with pink or white flesh will appear opaque rather than translucent when fully cooked. The flesh should feel firm, but still look and feel moist. If you’re not sure, use a fork to break into the fillet. The meat should easily flake. Avoid overcooking fish as it dries out easily.
Fish steaks, including salmon and swordfish, respond well to grilling. They’re firm, so they stand up to the grates and this less precise method of cooking.
Preheat the grill. Ensure your grill is clean or you’ll risk having the fish stick and fall apart during the cooking process.
Place the fish steak directly on the grill in the hottest portion. Sear the outside for1 to 2 minutes per side.
Move the fish steak to a slightly cooler section of the grill to finish cooking. Use the 10-minute-per-inch rule.
Tips
If you’re grilling fish that still has skin attached, such as whitefish or coho salmon, place a greased layer of foil over the top of the grates and grill the fish, using the 10-minute rule.
To cook fillets on the grill, wrap them along with seasonings in foil and use the 10-minute rule. You should also wrap whole fish — and the 10-minute rule applies as well. Enhance the flavor of grilled fish with a flavorful marinade.
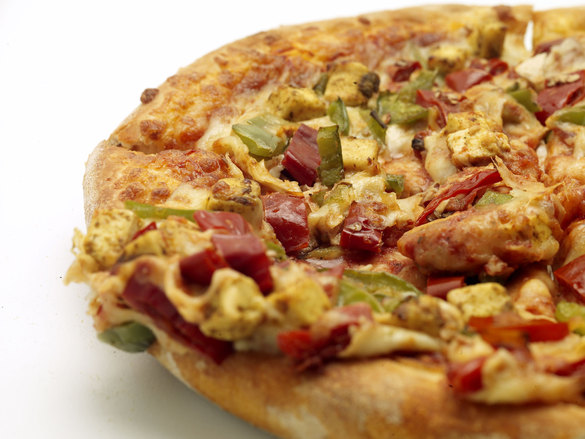
The pizza market is a huge slice of the restaurant industry, reaching over $38 Billion in 2015 according to PMG Pizza Magazine. Pizzas are flying out of the ovens at an incredible rate as the restaurant industry is forecasted by the NRA (National Restaurant Association) to continue to grow. Millennials are leading the way in pizza purchasing power and Mintel is projecting them to account for 30% of all U.S. retail sales by 2020.
Millennials are a generation of foodies who want pizza, and they want it now. To keep wait times down and quality up, many pizza restaurants are using pizza warming cabinets. These pizza hot boxes are designed to keep pizza hot while maintaining a high quality, service ready product. The millennial foodie is aware of the quality products that are available; They know and seek out new, intense flavors, and textures of artisan dishes.
It’s paramount that pizzerias keep the high-quality product that they are turning out of their kitchens all the way through the sales processes. The investment and efforts that are put into the staple menu item should not be neglected in the few precious minutes before the customer bites into the slice. 80% of what makes that product great, is what happens between the oven and the plate.
Specially designed foodservice equipment such as pizza warmers, or holding cabinets, are made to maintain safe food temperatures while keeping the pizza as hot and fresh as it is right out of the oven. To do this, companies such as FWE / Food Warming Equipment have figured out the ideal temperature and humidity settings specifically for pizza. FWE has found that maintaining and holding pizza at 150°F – 160°F with a relative humidity* of 15% – 20% will keep the pizza at an optimal serving quality.
FWE’s hot holding pizza cabinets come with something very unique in the industry; They have a small removable water pan located by the heating elements and an air circulating fan, that allows for just the right amount of vapor to lift out of the water and humidify the cabinet. This heated holding environment is made with your pizza in mind. Being product specific when designed means they have engineered the correct wattage for food temperature, along with the correct air to moisture levels to maintain product consistency.
As the pizza industry is sure to continue to feed the generations following the millennials, the consumers are going to seek faster service and higher quality. Foodservice solutions are available to help as labor becomes difficult to find, and as customers become more informed and picky. Something as simple as a pizza warmer cabinet can help you get and keep that slice of pizza industry business.
* the amount of water vapor present in air expressed as a percentage of the amount needed for saturation at the same temperature.
We get it: Taking even a day off from your fast-paced work routine is a lot to ask. But some events are worth breaking away. The NAFEM Show, Feb. 9-11 in Orlando, Fla., is the one place where you can truly focus on bringing your business to the next level – with innovative equipment and supplies and invaluable networking opportunities. Here’s why The NAFEM Show is worth your while:
It brings together the best in the business, for your business. The racket of broader industry events can be distracting. At The NAFEM Show, you’ll focus exclusively on the foundation of operational success: innovations in equipment and supplies. With 500+ exhibitors offering the latest in prep, cooking, storage and service, you won’t find a more diverse, yet focused, show.
Everything you’re looking for is in one place. Shopping for new equipment and supplies is time-consuming. Save time by browsing the latest products across every category in person at The NAFEM Show.
The equipment and supplies are game-changing. Exhibitors bring their A-game to The NAFEM Show – and you reap the benefits. More than ever, the equipment and supply innovations you’ll see here have the power to drive down utility, labor and food costs, and improve customer satisfaction and food safety.
The latest and greatest products are earmarked. The WHAT’S HOT! WHAT’S COOL!® New Product Gallery at The NAFEM Show displays unique new innovations in terms of equipment and supplies – in one convenient hub.
Attendees are impressed. Nearly two-thirds of attendees of The NAFEM Show 2015 said the event was “much better than they expected” compared to other industry shows. What’s more, attendees spent an average of about 13 hours on the show floor over 2 days – that’s 3 hours more than the average trade show attendee.*
You’ll be in good company. The NAFEM Show draws decision-makers from all segments of the foodservice industry. The best in the business attend, and you should too.
The networking and entertainment rocks. Start the show off in high spirits with good food and drink, great company and a killer cover band; then, wrap things up at the After-Show Party. Big-name performers like Zac Brown Band and Jimmy Buffett have graced our After-Show Party stage. This year could be our biggest act yet. Sign up to be the first to hear about it.
You’ll get valuable education and training opportunities. Several show exhibitors offer training and certification sessions in their booth – many with well-known and respected industry experts. Attendees also can certify as a Food Protection Manager during the show through the ServSafe Food Protection Manager’s Exam.
Badges are a steal. The value of the show far outweighs your entry fee of just $30 (get the Early Bird rate!). What’s more, all attendees qualify for The NAFEM Show Scholarship Program: $500 to offset travel expenses.
Orlando in February – need we say more? Sunny Orlando is a happy backdrop for our show. Take a break and invest in an experience that can take your business to the next level.
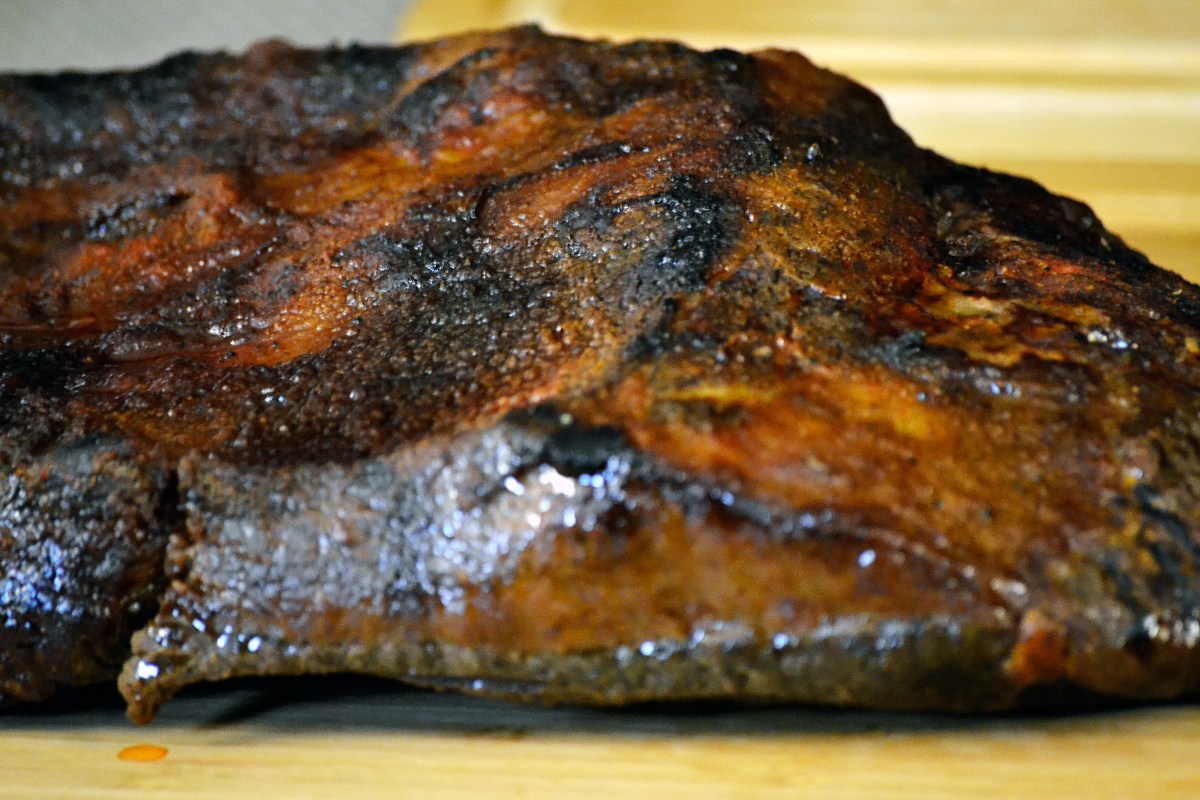
Brisket is a great example of the perfect cut of meat that bodes well with barbecue. As we know, barbecue is a method of indirect low and slow cooking. Generally, meats that are tough need the low and slow technique to break down connective fibers to become more tender and delicious.
You might now ask yourself “why is the brisket such a tough muscle?”. Well, as cattle don’t have collar bones, and their heavy upper body that makes up over half its weight is supported by these chest muscles, this piece of meat holds up a lot of bovine weight. That makes for a well-used Schwarzenegger approved daily work out.
In this post, I will be going over some of the basics about cooking a brisket that you may or may not already know.
Selecting Meat
Depending on where you shop, you will see a (NAMP 120) beef brisket, this comes with the Flat(120A) and the Point(120B) together, or you can purchase the individual cuts separately. I personally use the Flat(120A) because it gives the best competition looking slices and cooks more evenly than the whole brisket. For a better value the whole (120) can be used, the flat for brisket slices, and the point for burnt ends inside dishes such as your BBQ beans.
When you are looking at the meat you should take note of the marbling and the fat cap. The fat cap should be pretty much trimmed at the time of purchase but a good rule of thumb is, if you press down on top of the fat, you should feel a little bit of a bounce, or give, to the pressure you put on it. If the fat is so thick that it has no resistance when pressed down on, trim it to around 1/8th of an inch thick.
Injection
This is where you can get a little more creative in terms of flavor for your meat. This step is not absolutely necessary, but if you wish, it’s very similar to making a marinade. Use an apple cider, or cider vinegar, mixed with some stock and seasonings. Be careful that your seasoning is ground fine enough to pass through your injector without clogging it up. You can use tenderizing salt in the injection as a cheat for a more tender brisket and deeper smoke ring, but like I said, that’s a cheat and not condoned by the likes of me. I have always been told you can never over inject meat, so apply as much or little as you wish.
Mop
This mop is not the same as a mop that is used to continue to baste with during the cooking process. For this “precook” mop I use a mixture of hot sauce and mustard. The hot sauce will add a bit of zing whereas the mustard will help in color and give your rub something to stick to. Spread this mixture out over the meat coating the brisket all around. Basting is not as necessary in an FWE Cook and Hold smoker because the design keeps the moisture in the meat better than typical barbecues. However, I’m not going to tell you to stop adding flavor, if you wish too, baste away. It’s just not necessary to the moisture level of the meat.
Rub
A tip to remember when selecting a rub is to be mindful of the sugar content in the blend. I use a good amount of brown sugar in my rubs, so when I cook, I keep my temperature below 225 (sugar starts to burn or degrade above 225).
As for making your own or buying a premade mix? I have heard it from many of the best in BBQ, they buy pre-manufactured rubs. Making your own award winning rub takes a lot of time and effort, but in my humble opinion, I like to put my own spin on what I touch. So when, or if I do, buy a premade rub, I always add a little something to it to make it my own.
Cook by probe
Cook the brisket up to an internal temperature of 180F, at this temperature the product starts to break down and become very tender. Depending on how tender you wish the product to be is determined by how long the product remains at this temperature. To get your feet wet, cooking by a probe is the best way to get a great and consistent product.
Cook by Time
Once you have your system down, you might want to adjust your cooking process. Some people cook at low temps like 225F for over 12 hours. Cooking by time gives you more control of how long your product is at that internal temp of 180F getting it even more tender. It does come at the risk of making a mistake that can overcook or dry out the product.
Smoke
With meat that has a robust strong flavor like a brisket, you want to smoke it with a hardwood that really smacks with flavor. Use a hickory or mesquite to really get a solid flavor, save your fruit woods like apple and cherry for pork or chicken. I have soaked my chips with liquids such as port wine and beer to add a little more dimension to the smoke profile. You can get real creative in the wood chip department, people smoke with things like corn cob, grape vine, and even tea leaves.


 Tips
Tips
 2015 according to